Showing posts with label Sewing Projects. Show all posts

Tuesday, May 31, 2011

The Painted Fixed Roman Shade

I hope that everyone had a wonderful Memorial Day Weekend. Memorial Day Weekend is my fav weekend of the year because it usually means that we are celebrating my birthday! I'll spare you all of the pics from the weekend, but it was a good one. Thanks to my lovely family and friends, I had a girl's night, birthday bbq at my house (I didn't have to cook a thing), and I received some lovely presents.

Last week a left you with a peek at my latest project. Did any of you guess that I was going to make a faux fixed roman shade out of a shower curtain that I spent way too many hours painting?

The door that leads to the garage from our den isn't pretty. At all. There is a weird screen over the window that needed to be covered up. In true Nikki form I decided that I would try to cover it very stylishly without spending much money.


I am a big fan of the chipper pattern, but I needed it in navy.  I couldn't find it in navy, but my friend Liz painted the pattern on her breakfast room chairs. She is brilliant like that. This is why I like paint so much. It comes in any color. Armed with a no longer used white canvas shower curtain, leftover navy paint from the built-ins, a small piece of cardboard cut out in this pointy oval shape, and my paint brushes, I painted my own chipper pattern.


Let me just say that while I am very happy with the end result, the process was pure torture. I traced each pointy oval with a pencil and then filled them in with paint. It took forever! It wouldn't have been bad if I was good a pacing myself and had spread this out over a few days, but I did it all at once. I just couldn't seem to stop until it was done. Not pacing yourself = torture. Otherwise, it was quite simple.


 I chose to do a fixed roman shade because I didn't need it to function. I just wanted the ugly screen/window covered up. I followed this tutorial from Centstional Girl.


Later this week I plan to show you a true before of this room and another little update that I made.

This post is linked to these parties:
Tatertots and Jello
Just a Girl


Top Mommy Blogs - Mom Blog Directory

Monday, February 28, 2011

a pillow cover

I have been procrastinating.  Instead of painting walls in our house I have been sewing pillow covers with a scrap pack I purchased on etsy, painting artwork for the walls (that need to be painted), and continuing to spend huge amounts of time painting accessories and rearranging the built ins


Here is the pillow cover. I'm not sure what direction I am going to take our master bedroom when it's time to give it a face lift, but for now this pillow cover makes me happy.

Top Mommy Blogs - Mom Blog Directory

Wednesday, December 8, 2010

Staying Organized on the Run


I'm not sure how everyone else does it, but when I run errands I usually have a bunch of paper to keep up with. (stuff for the post office, coupons, lists, etc) I decided to make something to keep myself organized for such outings.


I searched for a tutorial for a notebook cover and couldn't find what I wanted, so I had to wing it. I needed something for a regular 5x7 notepad that I could tear sheets out of when I was through with them. (all I could find were tutorials for composition notebook covers)  It took a little tweaking, but in the end it came out just right. Now I have a pretty and organized way to keep up with my junk when I am out and about.


How do you keep up with all your "paper stuff" when you are out running errands?
Do you just sew your own stuff when you can't find what you are looking for?


Top Mommy Blogs - Mom Blog Directory

Wednesday, November 10, 2010

I've been busy sewing.


Look what I made!  Just in case you haven't seen the Buttercup Bag by Rae, this is it. She offers this pattern for FREE, and it it very easy to follow. I also made a ruffled gadget sleeve (my pattern) that I can use for my phone or camera.

I haven't been able to stop sewing. I have made pj's for the boys out of shirts my husband no longer wears, a couple different purses and gadget sleeves, a stuffed dinosaur, coasters, and now I'm working on a quilted runner.

Do any of you sew? What do you like to make?

Tuesday, October 26, 2010

the little man apron


I mentioned  last week that I was going to make my little man an apron with some of the fabric that I won from Knitty Bitties' scrap pack giveaway. Well, here it is. He is so excited to have an apron of his very own to wear when he helps me in the kitchen or when he is pretending to be our waiter. I made sure that he had a few pockets for his notepad and pen.

And just so you know, the apron doubles as a cape...that is a little boy for you.

Monday, October 4, 2010

drop cloth pillow covers {stripes}


I have a problem when it comes to committing to pattern. I like pattern. I am drawn to it. Just can't commit. I look at fabric, think it is the one, and then decide that as much as I change my mind, it will end up being  waste of money....I'm working on it.

So, in the mean time, I needed some new pillow covers. Since I can't make up my mind I decided to make some out of 'scraps' in my fabric box. If I hate them in a week, oh well. No money wasted. But for now, I really like them. I will always had a thing for stripes.

After some left over drop cloth, brown craps {ok, so it was an old brown curtain that I cut up}, and a little time cutting and sewing,  I now have new pillow covers that didn't cost me anything.


Saturday, September 11, 2010

point and shoot ruffled wrist strap {tutorial}


Point and Shoot Ruffled Wrist Strap - say that five times, really fast.

Ok, so not everyone has a cool DSLR with a pretty strap cover. (and that is ok ) Some of us still have a point and shoot with a dinky black wrist strap. I was inspired to make a pretty strap for my camera little camera.

I'm not one to read or follow directions (for anything).

I don't sew very often, but when I do it's usually because I see something that I like and then just decide to "wing it" and hope it turns out good enough.

This is how I made a point and shoot ruffled wrist strap.


You will need 
2 coordinating fabric strips, (1 - 40" long for the ruffle , 1 - 16" long for the strap, the width is up to you)
round cord elastic - about 5"
sewing machine
iron
needle and thread (optional)

Cut you first strip of fabric for the ruffle 40" long. The width will depend on how wide you want your strap and if your are using a cotton or knit fabric. If you are using a knit you don't need to finish the edges. If you are using a cotton then add enough extra to allow for a finished seem.


I'm going to use pictures and directions for the ruffle made with a knit fabric.


Sew a long basting stitch (on most machines this will be stitch length 5) down the middle. DO NOT back stitch at the beginning or end. OR you can sew this with a needle and thread just use long stitches. Then pull your bobbin thread only (the one on the bottom) to gather your ruffle strip. OR if you stitched it by hand just pull the single thread to gather your ruffle strip.


Now, take the other strip of fabric (mine was 5" wide) fold in half and iron a crease. Open the fabric and turn in a 1/4" hem on each side and iron. You will also need to turn down the ends and iron them down to create a nice clean edge just like you did on the sides.

(I now see the I didn't take pics of all of the steps, oops)

Fold the fabric back in half and sew a seem down each side.

Place the ruffle on the front side of the strap and sew it the strap straight down the middle.


If you made it this far without pictures the back should look like this. :)

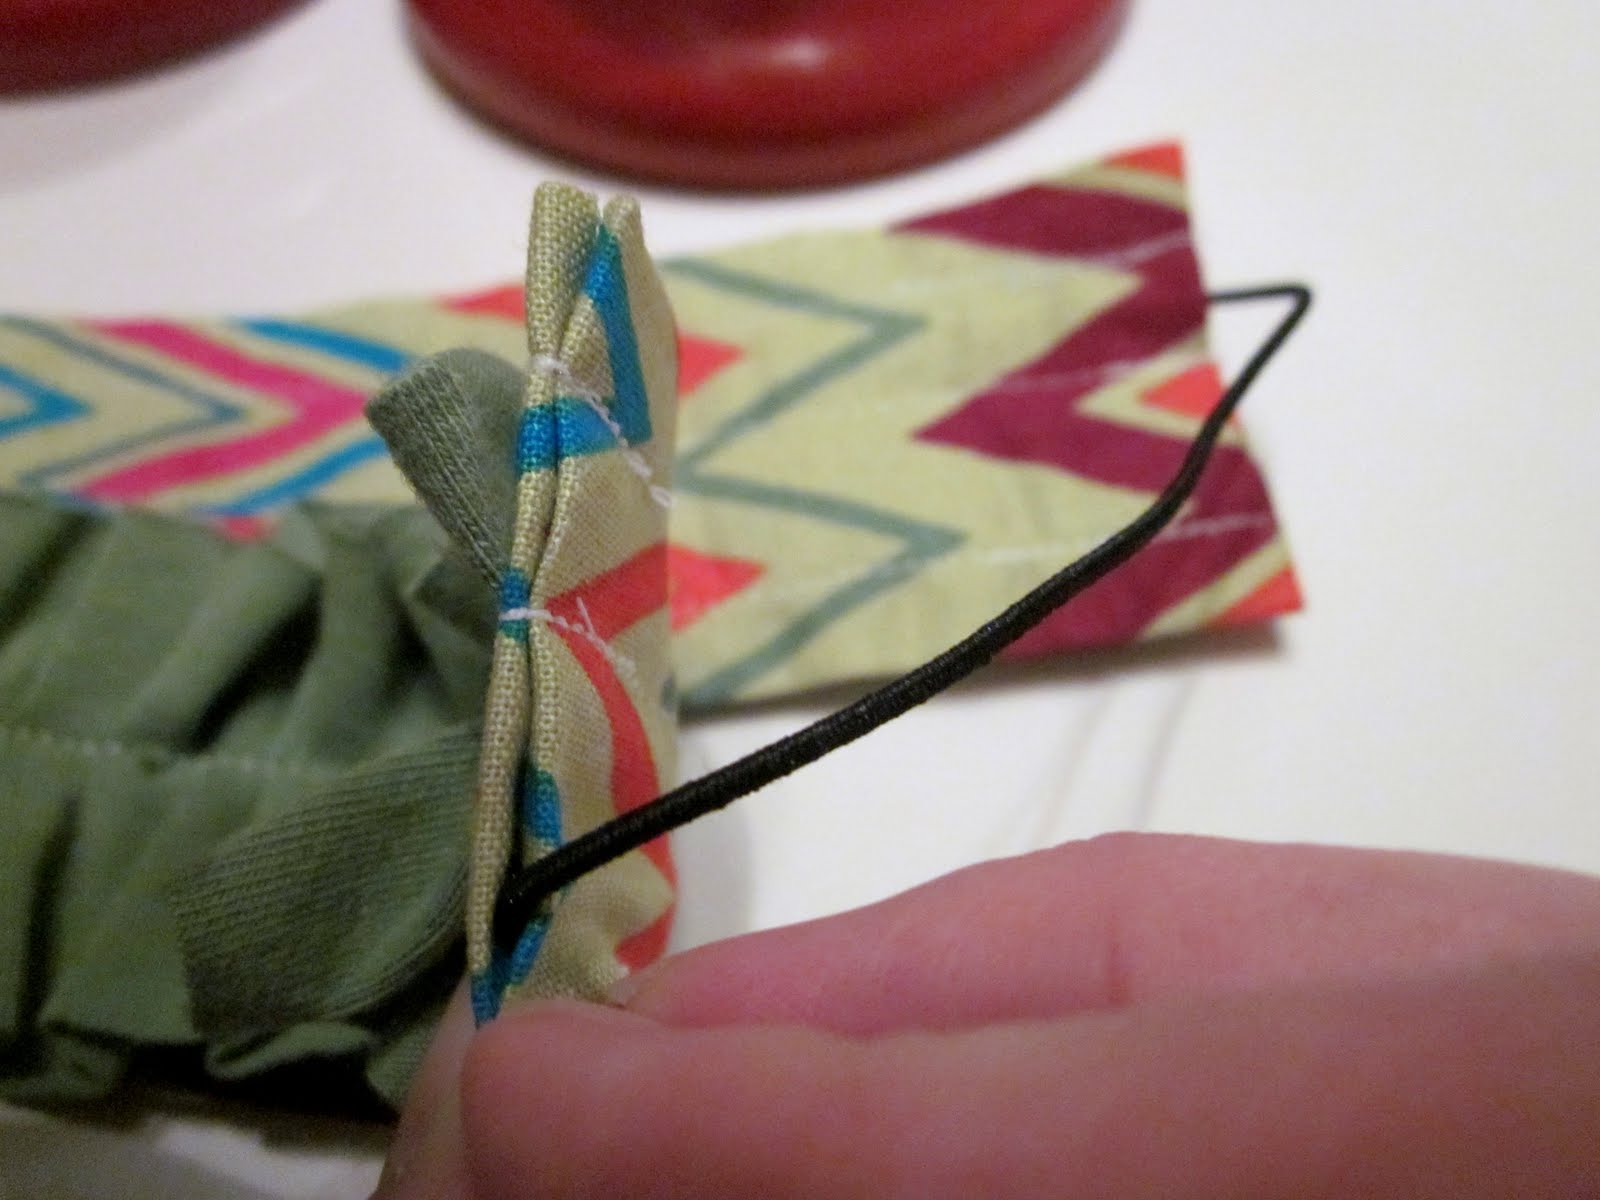
Insert approx 1 inch of elastic into one end of the strap.


Insert the other end of the elastic into the opposite side of the other end of the strap. Make sure that there is about an inch of elastic pushed down into the strap.

Now, put both ends of the strap, back sides together, and sew them together. All of the layers of fabric make this the most difficult step, but make sure that your elastic is sewn in nice and securely.


I'm sorry for the lack of pictures for all of the steps. I just started sewing and didn't stop. If you have any questions, please ask them and I will do my best to answer them.

*for personal use only.*

linked to :
Tatertots and Jello
Just a Girl
Funky Junk Interiors
A Little Knick Knack


Tuesday, May 11, 2010

Drop Cloth Slipcovers


When we turned our office into a nursery, these ottomans found there way into the living room as our coffee table. I found them on major clearance at Target, and they didn't "Match" their new home, so I thought I would attempt to MAKE slipcovers for them. This should be easy, right? It's just 5 squares.

I will spare you the how to pics.

1. I didn't take any.
2. If you sew for real, they would make you cringe, if said pics actually existed.

I couldn't commit to a pattern or even a color when it came to choosing fabric. I have a 4 year old little boy that likes to lay all over these. Eat snacks on them. And who knows what else. I decided that I needed something EXTREMELY durable. I chose drop cloths.

1. They are durable and washable.
2. If I hated them or they didn't fit right, I hadn't wasted much money.

before

after

I am really liking how these turned out. They are not perfect, but I really like them. They are functional and they hide the black faux croc. If my 4 year old gets something on them I can just toss them in the washer.

Here are a few tips if you attempt to make these.
1. Make sure you wash and dry them first.
2. Measure, measure, and measure.
3. If you like to sew the lazy way like me, you can cut them so that you use the hemmed side at the bottom of each piece and you don't have to actually hem them.

What about you? Have you made anything using the drop cloths that Layla made famous?

Linked to:
DIY Day - A Soft Place to Land, Just a Girl - Show and Share Day, SNS - Funky Junk Interiors, Made By You Monday, Market Yourself Monday - Sumo's Sweet Stuff, Frugal Friday - The Shabby Nest, Wednesday Link Party - Tea Rose Home, Get Your Craft On - Today's Creative Blog Pink and Polka Dot - Slipcover Party, Thread Needle Studio - Slipcover Showoff


Tuesday, April 13, 2010

From French Country Check to Modern Stripes

I finally finished the pillow cover that was on my project list.
I am thrilled with how it turned out.

This silk fabric started out as a green checked fabric.
It was given to me by a sweet friend.
At the time I knew that I really liked the colors, but wasn't sure what I would do with it.
I wasn't completely sold on the checks, but what if I could make stripes.

So, I cut out what seemed like a thousand green colored squares, pinned them together,
sewed them up, and now they are stripes.

This was a lot of cutting, sewing, and ironing for 1 pillow cover,
but it was totally worth the effort.
My master bedroom mini makeover is one step closer to being done.


LinkWithin

Related Posts Plugin for WordPress, Blogger...